Essential DIY Home Improvement Projects Every Homeowner Should Know
Reading time: 14 minutes
Ever stared at a leaky faucet at 11 PM, phone in hand, dreading the plumber’s bill? You’re in good company. In 2026, the average American homeowner spends $4,800 annually on home repairs and maintenance — but studies show that homeowners who master even a handful of DIY skills can slash that figure by 35 to 50 percent. That’s real money back in your pocket, and real confidence in knowing your home inside and out.
Here’s the straight talk: You don’t need to be a contractor to handle the most common home improvement challenges. What you need is the right knowledge, the right tools, and a clear roadmap. This guide delivers exactly that — whether you’re a first-time homeowner nervously tackling your first project or a seasoned DIYer looking to level up.
Table of Contents
- Why DIY Skills Matter More Than Ever in 2026
- Building Your Essential DIY Toolkit
- Plumbing Basics Every Homeowner Should Master
- Drywall Repair: From Small Holes to Larger Patches
- Interior Painting Like a Professional
- Flooring Fixes and Installations
- Electrical Basics: What’s Safe and What Isn’t
- 3 Common DIY Challenges and How to Overcome Them
- DIY vs. Hiring: A Cost Comparison
- DIY Project Confidence Levels Among Homeowners
- Frequently Asked Questions
- Your DIY Roadmap: Start Building Today
Why DIY Skills Matter More Than Ever in 2026
The home improvement landscape has shifted dramatically. In 2025, labor shortages in the skilled trades industry pushed contractor waiting times to an average of three to six weeks in most major metro areas, according to the National Association of Home Builders. Simultaneously, material costs stabilized after the post-pandemic volatility, making now an ideal moment for homeowners to take control.
Beyond the financial argument, there’s something deeply satisfying about fixing or improving your own space. A 2025 HomeAdvisor survey found that 78% of homeowners who completed at least one DIY project reported higher overall satisfaction with their living environment compared to those who exclusively hired out work. The act of doing instills ownership — literally and emotionally.
Consider the story of Marcus and Elena, a couple who purchased their first home in Austin, Texas, in early 2025. Facing a $6,200 estimate for bathroom tile replacement, they watched a series of instructional videos, purchased $380 worth of tools, spent two weekends working, and completed the project for under $900 total. “It wasn’t perfect,” Marcus admitted, “but it was ours. And honestly, we’d do it again in a heartbeat.”
“The gap between what homeowners think they can do and what they actually can do is mostly psychological. Give someone the right information and the right tools, and most standard home repairs are well within reach.” — Sarah Kimball, Master Carpenter and Host of Build Smart podcast, 2026
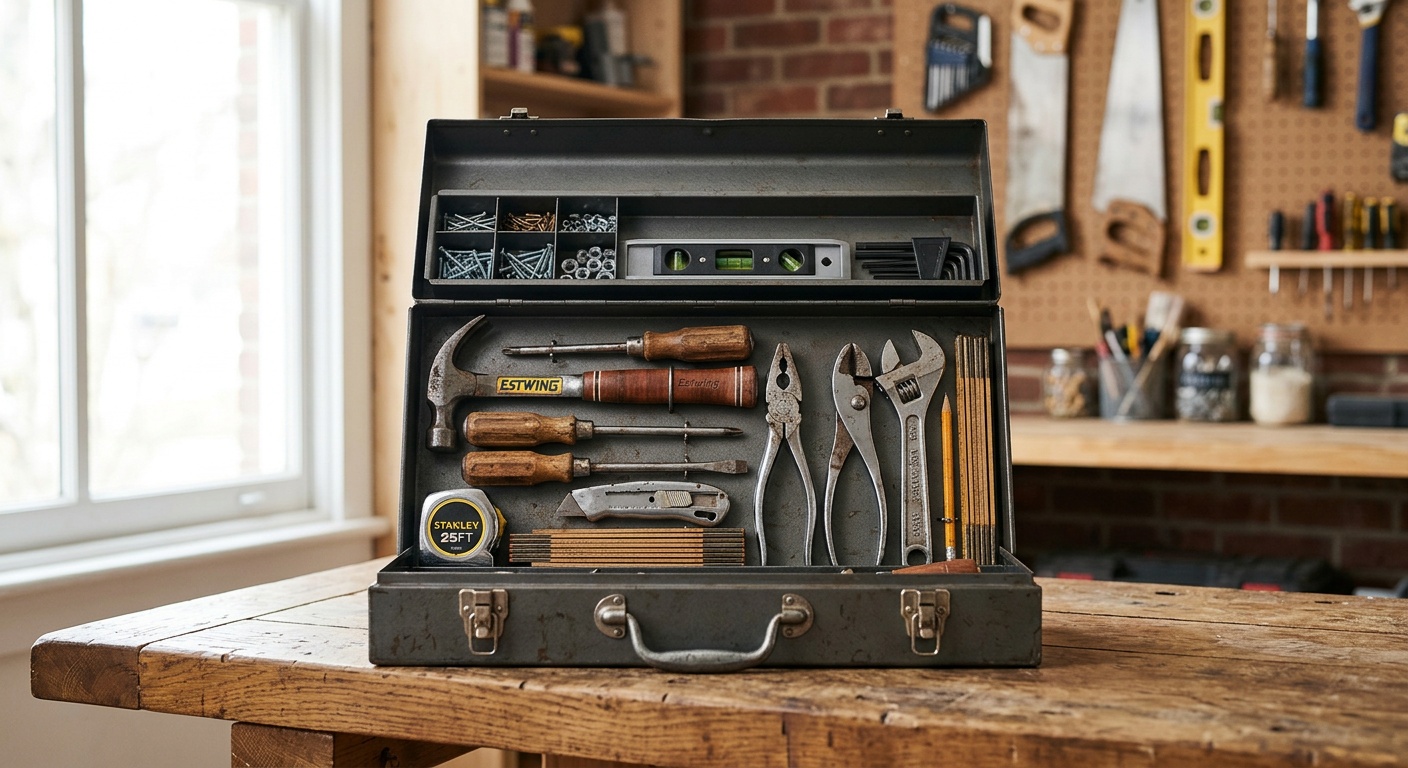
Building Your Essential DIY Toolkit
Before diving into specific projects, let’s talk about your toolkit. A well-equipped DIYer doesn’t need hundreds of tools — they need the right ones. In 2026, smart tool investments pay dividends across dozens of projects.
The Non-Negotiable Starter Tools
Every homeowner should own the following, regardless of their skill level:
- Cordless drill/driver combo — The single most versatile tool you’ll own. Budget $80–$150 for a reliable model with two batteries.
- 25-foot tape measure — Measure twice, cut once. Always.
- 4-in-1 screwdriver — Phillips and flat-head in one compact tool.
- 16-oz claw hammer — Classic, indispensable.
- Level (24-inch) — Crucial for hanging anything straight.
- Utility knife with extra blades — You’ll reach for this constantly.
- Adjustable wrench set — Two sizes cover most plumbing needs.
- Safety gear — Safety glasses, work gloves, dust masks. Non-negotiable.
Intermediate Tools Worth the Investment
Once you’re comfortable with basic projects, consider expanding to:
- Oscillating multi-tool — Cuts, sands, scrapes. Handles tasks nothing else can.
- Circular saw — Opens up flooring, decking, and framing projects.
- Stud finder — Modern electronic models (under $30) are highly accurate.
- Wet/dry shop vacuum — Essential for cleanup and even some plumbing tasks.
- Caulk gun — One of the most underrated tools in any home.
Pro Tip: In 2026, tool-sharing platforms and home improvement store rental programs mean you don’t need to buy specialty tools for one-off projects. Renting a tile saw for a weekend costs about $45 — far cheaper than purchasing one you’ll use twice.
Plumbing Basics Every Homeowner Should Master
Plumbing emergencies are among the most anxiety-inducing home crises. But the reality? The vast majority of household plumbing issues are surprisingly manageable with basic knowledge.
Fixing a Running Toilet
A running toilet wastes approximately 200 gallons of water per day, according to the EPA’s 2026 WaterSense data. That translates to $70–$100 per month added to your water bill. The fix, however, is almost always one of three culprits: a worn flapper, a faulty fill valve, or an improperly adjusted float.
Here’s your quick diagnostic process:
- Remove the tank lid and observe the water level. If it’s overflowing into the overflow tube, your float is set too high — bend the float arm down slightly or adjust the adjustment screw.
- Drop food coloring into the tank without flushing. If color appears in the bowl within 10 minutes, your flapper is leaking. Replace it (cost: $5–$12).
- If the toilet runs intermittently, the fill valve likely needs replacement. This is a 20-minute project costing $15–$25 in parts.
Unclogging Drains Without Chemicals
Chemical drain cleaners damage pipes over time and are harmful to the environment. In 2026, eco-conscious plumbing solutions have become mainstream — and they work better anyway.
For sink clogs: Remove and clean the P-trap (the curved pipe beneath the sink). This handles 80% of sink clogs immediately. For stubborn clogs, a $30 drain snake reaches deep blockages that chemicals never touch.
For shower clogs: A hair-removal tool (often called a “drain claw,” available for $3–$8) resolves the vast majority of shower clogs in under two minutes. Keep one under every bathroom sink.
Additionally, knowing how to shut off water at the main valve is one of the most important skills a homeowner can have. Walk your home’s perimeter and locate this valve today — before you ever need it in an emergency.
Drywall Repair: From Small Holes to Larger Patches
Drywall damage is almost universal in lived-in homes — doorknobs punch through walls, anchors fail, and renovation projects leave holes. Professional drywall repair typically costs $200–$500 for even small jobs. DIY? Usually under $30 in materials.
Small Holes (Nail Holes to 1/2 inch)
For nail holes and small dings, a simple two-step process works beautifully:
- Apply lightweight spackle with a putty knife, slightly overfilling the hole.
- Once dry (typically 2–4 hours), sand smooth with 120-grit sandpaper and paint.
Medium Holes (1/2 inch to 4 inches)
Self-adhesive mesh patches have transformed medium-hole repair. These peel-and-stick reinforcement patches (available in multipacks for $8–$15) provide the structural backing you need. Apply the patch, spread joint compound in thin layers, feather the edges wide, sand between coats, and paint. Three thin coats beats one thick coat every time — this is the mistake most beginners make.
Larger Patches
Holes larger than 4 inches require a “California patch” or a backed patch with wood supports. The technique involves cutting a clean square around the damaged area, installing wooden backing strips, cutting a matching drywall piece, and taping the seams with paper tape and joint compound. It sounds intimidating, but a methodical approach yields professional results.
Case Study: Jennifer, a homeowner in Portland, Oregon, had a 6-inch hole left by an electrician during a panel upgrade in 2025. After getting a $350 quote to repair it, she spent $22 on materials and two hours following step-by-step guidance. “The hardest part was waiting for the compound to dry,” she said. “The actual work took maybe 45 minutes across three days.”
Interior Painting Like a Professional
Few home improvements deliver a higher return on investment than fresh paint. In 2026, premium interior paints with built-in primer and antimicrobial properties are widely available, making the job faster and more durable than ever.
The difference between a DIY paint job that looks amateur and one that looks professional comes down almost entirely to preparation and technique, not expensive tools.
- Preparation is 60% of the job. Patch all holes, sand imperfections, clean walls (TSP substitute works well), and tape meticulously. Skimping here shows immediately.
- Use quality tools. A $15 Wooster or Purdy brush outperforms a $3 brush dramatically. Quality roller covers (3/8-inch nap for smooth walls) hold more paint and release it evenly.
- Cut in before rolling. Use a brush to paint a 2–3 inch border at ceilings, corners, and trim before rolling the main surfaces. This “cutting in” technique creates clean edges.
- Two coats, always. Even with premium paint-and-primer combos, two coats deliver dramatically better color depth and durability.
- Maintain a wet edge. Roll in overlapping sections, always connecting to wet paint to avoid lap marks.
Pro Tip: The 2026 trend in interior design leans toward deep, saturated tones — forest greens, terracotta, warm navies. When painting with dark colors, ask your paint supplier to tint your primer to a gray base. This reduces the number of coats needed by one, saving time and money.
Flooring Fixes and Installations
Flooring projects range from quick fixes to multi-day installations, and knowing which you’re dealing with determines your approach.
Fixing Squeaky Floors
Squeaky floors are caused by wood subfloor rubbing against joists or fasteners. The fix depends on whether you have access from below (basement or crawlspace) or only from above.
- From below: Have someone walk on the squeaky area while you observe from below. Mark the movement and drive a short screw up through the subfloor into the finished floor — use a screw short enough to not penetrate through. Instant silence.
- From above: Products like the Squeak-Ender system and CounterSnap screws (available at most home improvement stores) allow you to address squeaks from above without visible holes in finished flooring.
Luxury Vinyl Plank (LVP) Installation
LVP has become the dominant flooring choice for DIY homeowners in 2026, surpassing laminate in both market share and customer satisfaction ratings. It’s waterproof, durable, relatively forgiving to install, and available in styles that convincingly mimic hardwood and stone.
The click-lock floating installation system means no glue, no nails, and no special skills required for most rooms. Key principles include:
- Acclimate the flooring in the room for 48 hours before installation.
- Ensure the subfloor is flat within 3/16 inch over 10 feet — use a self-leveling compound for low spots.
- Maintain a 1/4-inch expansion gap at all walls and vertical surfaces.
- Stagger end joints by at least 6 inches between rows for structural integrity and aesthetics.
- Use a pull bar and tapping block to ensure tight seams.
Electrical Basics: What’s Safe and What Isn’t
Electrical work is the category where DIY enthusiasm must be tempered with genuine caution. Most jurisdictions allow homeowners to perform certain electrical work in their own homes — but understanding the boundaries is critical.
Generally safe for DIY: Replacing outlets, switches, and light fixtures; installing dimmer switches; replacing ceiling fans; adding or replacing GFCI outlets in bathrooms and kitchens.
Requires permits and often a licensed electrician: Panel upgrades, adding new circuits, subpanel installations, and any work involving the main service entrance.
The golden rule: Always turn off the circuit breaker and verify with a non-contact voltage tester before touching any wires. These testers cost $15–$25 and are the single most important safety tool for electrical work.
Replacing a standard outlet is genuinely straightforward: turn off power, verify it’s off, photograph the existing wiring before disconnecting, connect wires to the new outlet matching the existing configuration (black to brass, white to silver, bare copper or green to ground), and reassemble. The whole process takes 15–20 minutes.
3 Common DIY Challenges and How to Overcome Them
Challenge 1: Underestimating Project Scope
The classic DIY trap: what looks like a simple tile repair reveals rotted subfloor beneath. What appears to be a paint refresh uncovers significant water damage. The solution is a systematic pre-project inspection. Before committing to any project, spend 30 minutes probing, testing, and examining the surrounding area. Probe wood near water sources for softness (indicating rot), check for bubbling paint (indicating moisture), and examine adjacent areas that might be affected.
Practical fix: Add a 20% buffer to every time and budget estimate. If you think a project will take four hours and $100, plan for five hours and $120. This buffer reduces stress and almost always proves necessary.
Challenge 2: Choosing Wrong Materials
In 2026, the home improvement market offers bewildering product variety. The solution is specificity: understand exactly what environment a material must perform in (wet vs. dry, high-traffic vs. low, interior vs. exterior) before purchasing. A common mistake? Using interior caulk in a shower application — it fails within months. Always read the full product label for application requirements.
Challenge 3: Skipping Permits
Many homeowners skip permits to avoid hassle and cost. This is a mistake that can create serious problems at resale. Unpermitted work can void homeowner’s insurance, cause sale complications, and require expensive tear-out and rebuild to bring into compliance. In 2026, municipal permit systems in most U.S. cities have moved online and streamlined significantly — many simple permits can be obtained same-day online for $50–$100. The protection they provide is worth every dollar.
DIY vs. Hiring: A Cost Comparison
| Project | Avg. Pro Cost (2026) | Avg. DIY Cost | Potential Savings | Skill Level |
|---|---|---|---|---|
| Interior room painting (12×14 ft) | $650–$900 | $80–$130 | ~$600 | Beginner |
| Toilet replacement | $350–$550 | $130–$250 | ~$270 | Beginner |
| LVP flooring (200 sq ft) | $1,400–$2,000 | $400–$700 | ~$1,100 | Intermediate |
| Drywall patch (medium hole) | $250–$400 | $20–$40 | ~$330 | Beginner |
| Outlet/switch replacement | $150–$250 | $10–$25 | ~$185 | Beginner |
DIY Project Confidence Levels Among Homeowners (2026 Survey)
A 2026 survey by the Home Improvement Research Institute asked homeowners to rate their confidence in tackling common DIY projects. Here’s what they found:
Source: Home Improvement Research Institute, 2026 Homeowner Confidence Survey (n=4,200)
The data tells an important story: confidence drops sharply as projects approach electrical territory — which is actually appropriate. The goal of this guide is to raise confidence in the first four categories, while maintaining appropriate caution about the fifth.
Frequently Asked Questions
How do I know when a DIY project is beyond my skill level and I should hire a professional?
The honest answer involves three factors: safety, permits, and reversibility. If a mistake could physically injure you (working near live electrical panels, structural modifications), involves work that legally requires a licensed contractor in your jurisdiction, or could cause catastrophic damage that’s expensive to undo (like mishandling gas lines), hire a professional. A useful personal rule: if you can’t clearly visualize every step of the process before starting, spend more time learning before you begin — or consult a pro. There’s no shame in knowing your limits; in fact, it’s a hallmark of intelligence.
What’s the best way to learn DIY skills in 2026 — YouTube, classes, or books?
In 2026, YouTube remains the gold standard for visual, project-specific learning — channels like This Old House, Home RenoVision DIY, and April Wilkerson provide genuinely professional instruction freely available. However, don’t underestimate community learning: Home Depot and Lowe’s run free in-store workshops on topics ranging from tile installation to basic electrical work. For foundational knowledge, the Reader’s Digest Complete Do-It-Yourself Manual (updated 2025 edition) remains a comprehensive reference worth having on your shelf. The most effective approach is combining all three — watch a video to understand the full process, attend a workshop for hands-on practice, and keep reference materials available during execution.
How should I prioritize home improvement projects when I have limited time and budget?
Always prioritize by this hierarchy: first, address anything that threatens structural integrity or safety (roof leaks, electrical hazards, foundation issues); second, tackle projects that prevent further damage if left unaddressed (water intrusion, failing caulk, damaged gutters); third, pursue improvements that add comfort and functionality; and finally, focus on cosmetic upgrades. Within each category, calculate the ratio of impact to effort. Resealing a shower surround takes two hours and $15, prevents potentially thousands of dollars in water damage, and is a clear priority. Painting an accent wall takes four hours and $60 but is purely cosmetic — meaningful, but lower on the hierarchy. Map your projects against this framework and your path forward becomes clear.
Your DIY Roadmap: Start Building Confidence Today
You’ve covered a lot of ground in this guide. Now it’s time to translate knowledge into action. Here’s your practical roadmap for the next 90 days:
- Week 1 — Audit and assess. Walk every room in your home with a notepad. Document every imperfection, repair need, and potential improvement. Categorize each by urgency and skill level required.
- Weeks 2–3 — Build your toolkit. Acquire the non-negotiable starter tools if you don’t already have them. Budget $150–$200 for a quality basic set that will last decades.
- Week 4 — Start small, win big. Choose one beginner-level project from your audit list — a drywall patch, a running toilet fix, or repainting a single room. Complete it fully before moving on.
- Month 2 — Step up. Tackle an intermediate project. LVP flooring in a small room, a bathroom caulk and grout refresh, or replacing all outlets and switches in one room are excellent choices.
- Month 3 — Formalize your knowledge. Attend one free workshop at a home improvement store. The combination of your hands-on experience and structured instruction creates a powerful feedback loop.
The broader context matters here: in 2026 and beyond, homeownership increasingly rewards those who are actively engaged with their properties. Rising labor costs, climate resilience requirements, and the growing smart-home integration landscape mean that DIY competence is evolving from a nice-to-have into a genuine financial differentiator.
Here’s the most important thing to remember: every expert contractor started exactly where you are. The difference between a homeowner who pays $4,800 a year for repairs and one who pays $2,200 isn’t talent — it’s accumulated knowledge, a few good tools, and the willingness to try.
So here’s the question worth sitting with: Which project on your home’s to-do list have you been putting off that you could actually start this weekend? The answer might surprise you — and so might your own capability.
