How to Waterproof Your Basement Walls From the Outside: The Complete 2026 Guide
Reading time: 14 minutes
Water seeping through your basement walls isn’t just a nuisance — it’s a slow, silent destroyer of your home’s structural integrity, air quality, and resale value. If you’ve ever walked downstairs to find a puddle, a musty smell, or telltale white mineral stains creeping up your foundation walls, you already know the anxiety that comes with it.
Here’s the straight talk: exterior waterproofing is the most effective, most permanent solution to basement water intrusion — but it’s also the most involved. Done right, it addresses the problem at its source, before water ever gets a chance to penetrate your foundation. Done wrong, or skipped entirely in favor of cheaper interior patches, it’s only a matter of time before water wins.
This guide walks you through every step of the exterior waterproofing process — from diagnosis to drainage systems to choosing the right membrane — so you can make confident, informed decisions whether you’re hiring a contractor or tackling part of the work yourself.
Table of Contents
- Why Exterior Waterproofing Beats Interior Fixes
- Signs Your Basement Needs Exterior Waterproofing
- How the Exterior Waterproofing Process Works
- Choosing the Right Waterproofing Materials
- Drainage Systems: The Unsung Hero
- DIY vs. Professional Installation
- Cost Breakdown and What to Expect in 2026
- 3 Common Mistakes (and How to Avoid Them)
- Frequently Asked Questions
- Your Waterproofing Roadmap: Next Steps
Why Exterior Waterproofing Beats Interior Fixes
Let’s address the elephant in the room: there are cheaper, faster options — interior sealants, drainage mats, sump pumps alone. So why go through the effort and expense of excavating your foundation?
Think of it this way. If your roof had a hole in it, you wouldn’t just put a bucket on the floor and call it solved. Interior waterproofing methods manage water after it’s already entered your home. Exterior waterproofing stops it at the point of entry.
According to the Basement Health Association, approximately 98% of all basements in the United States will experience some form of water intrusion during their lifetime. More critically, a 2025 industry report from the National Waterproofing Contractors Alliance found that homes with properly installed exterior waterproofing systems had 73% fewer foundation repair claims over a 20-year period compared to homes relying solely on interior methods.
The benefits of going exterior are clear:
- Permanent protection — seals the foundation wall itself, not just manages leakage
- Prevents hydrostatic pressure buildup — redirects water away before it pushes against your walls
- Protects structural integrity — keeps moisture from degrading concrete, block, or stone foundations
- Improves indoor air quality — eliminates the moisture source that feeds mold and mildew
- Boosts home value — buyers and appraisers in 2026 increasingly scrutinize basement conditions
Signs Your Basement Needs Exterior Waterproofing
Visual Red Flags You Shouldn’t Ignore
Before you call a contractor or rent an excavator, it helps to understand what you’re dealing with. The symptoms of water intrusion are often subtle at first, then suddenly very obvious. Here’s what to look for:
- Efflorescence — those chalky white or gray mineral deposits on your walls are literally the residue of water that’s passed through your concrete or block
- Horizontal cracks in block foundations — these indicate serious lateral soil pressure and need urgent attention
- Stair-step cracks along mortar joints — classic sign of differential settlement and water erosion
- Damp or wet walls after rainfall — obvious, but often dismissed as “just condensation”
- Musty odors — mold and mildew thrive in moisture levels above 60% relative humidity
- Peeling paint or bubbling drywall on basement walls
- Rust stains near metal tie rods in poured concrete walls
When Interior Solutions Are No Longer Enough
Interior drainage systems and sump pumps have their place — they’re excellent supplementary tools. But there are situations where only exterior waterproofing will do:
- You have a finished or finishing basement and want true long-term protection
- You’re seeing structural cracks that need to be sealed from the outside
- Your original dampproofing (applied during construction) has deteriorated or failed
- Your property has significant grading or drainage issues that send water toward the foundation
- You’re preparing to sell and need a transferable warranty that buyers will trust
Quick Scenario: Imagine you bought a 1970s ranch home in the Midwest. The previous owners had interior drain tile and a sump pump. Works fine — until a heavy spring storm in 2025 overwhelmed the system and left two inches of water on your new LVP flooring. That’s your signal that the source, not just the symptom, needs addressing.
How the Exterior Waterproofing Process Works
This is where theory meets muddy reality. Exterior waterproofing is a multi-step process that requires excavation, surface preparation, membrane application, drainage installation, and proper backfill. Here’s each phase explained clearly:
Step 1: Excavation
The work begins by digging down to the full depth of your foundation footing — typically 8 to 10 feet for most residential basements. This is done either by hand (for tight spaces) or with a small excavator. The goal is to expose the entire exterior face of your foundation wall on the affected side(s). In 2026, many contractors use GPS-guided mini excavators that minimize disruption to landscaping, utilities, and hardscaping.
Step 2: Surface Cleaning and Crack Repair
Once exposed, the wall must be thoroughly cleaned of soil, old dampproofing tar, efflorescence, and debris. Any cracks are filled with hydraulic cement or polyurethane injection. The surface must be structurally sound before any membrane is applied — applying waterproofing over a crumbling wall is like painting over rust.
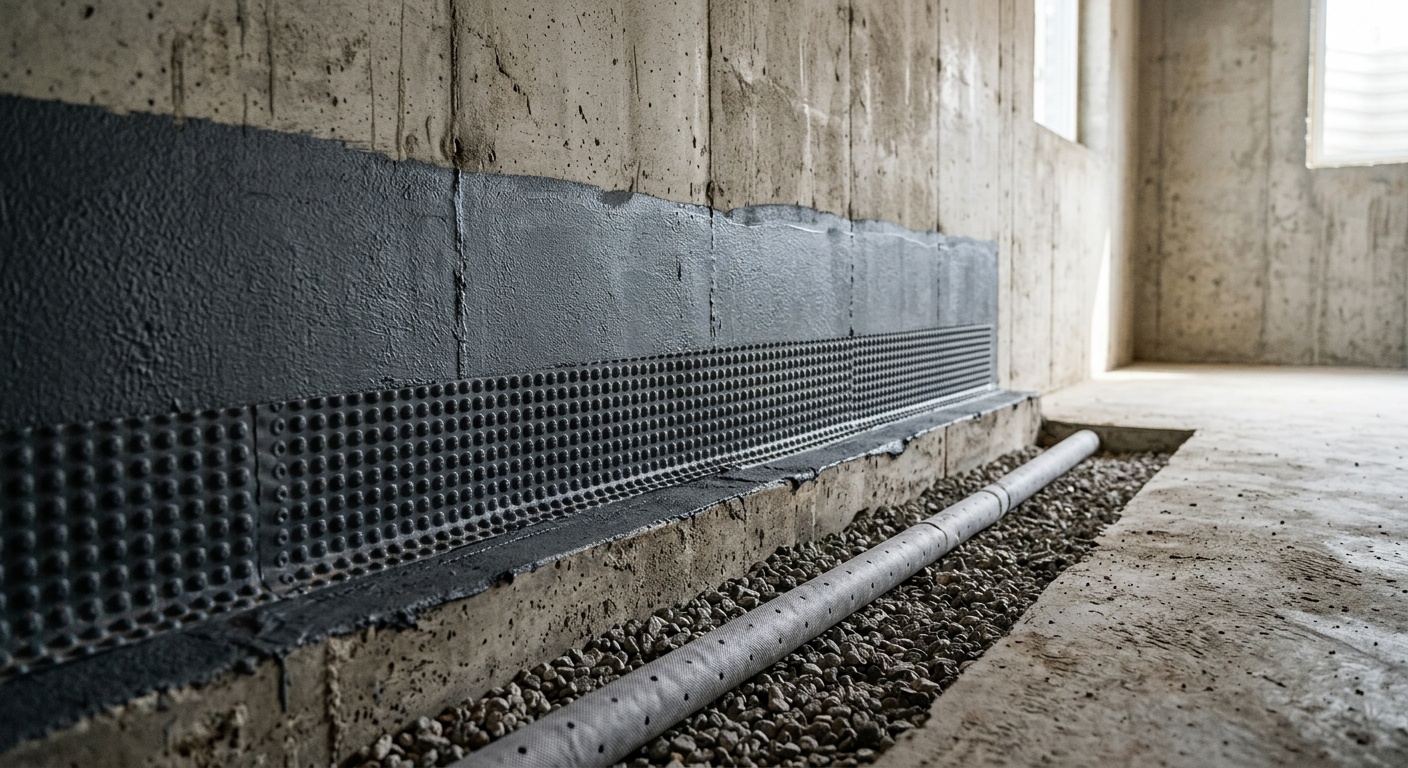
Step 3: Membrane Application
This is the heart of the system. A waterproofing membrane is applied to the clean, prepared wall surface. Options include:
- Liquid-applied rubber membranes (most common, rolled or sprayed on)
- Sheet membranes (self-adhering rubberized asphalt sheets)
- Crystalline waterproofing (penetrates and fills concrete pores chemically)
- Bentonite clay panels (swells when wet to create a seal)
The membrane typically extends from the top of the foundation wall down to and over the footing, ensuring continuous coverage with no gaps.
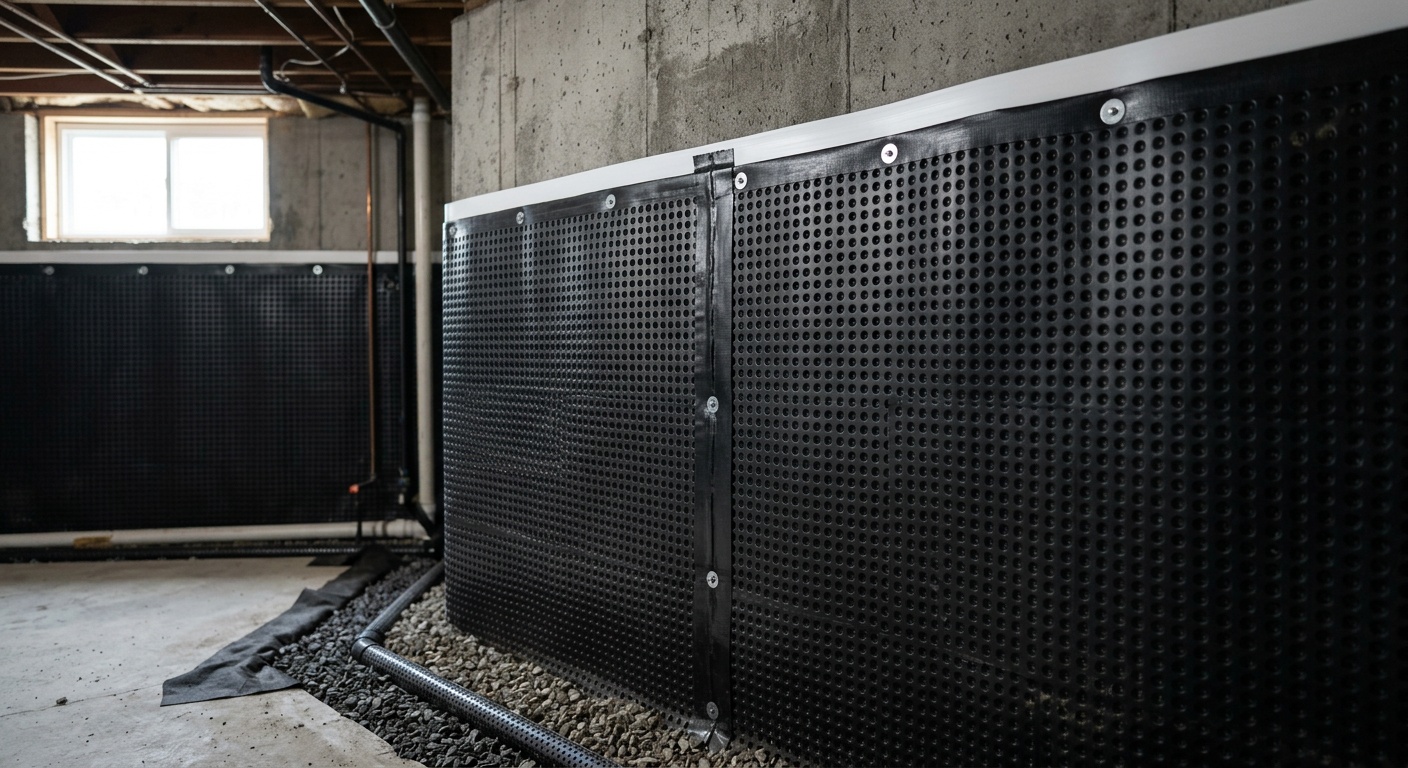
Step 4: Protection Board and Drainage Mat
A rigid insulation or protection board is often installed over the membrane to prevent puncture during backfill. A dimple mat (drainage board) is then placed against the wall. This crucial layer creates an air gap between the soil and the membrane, directing any water that does reach the wall downward toward the drainage system rather than allowing it to accumulate against the foundation.
Step 5: Drainage System Installation
At the base of the wall, a perforated drain pipe (often called a French drain or weeping tile) is installed along the footing, surrounded by clean crushed stone and wrapped in filter fabric. This pipe carries collected groundwater away from the foundation — either to daylight, to a sump pit, or to a storm drain, depending on your site.
Step 6: Proper Backfill and Grading
The excavated area is backfilled with free-draining granular material (crushed stone or coarse gravel) for the lower portion, then native soil toward the surface. The final grade must slope away from the house at a minimum of 6 inches over 10 feet — a non-negotiable requirement for keeping surface water moving in the right direction.
Choosing the Right Waterproofing Materials
| Material Type | Best For | Lifespan | Cost Range (per linear ft) | DIY Friendly? |
|---|---|---|---|---|
| Liquid Rubber Membrane | Poured concrete walls, most climates | 20–30 years | $80–$130 | Moderate |
| Self-Adhering Sheet Membrane | Block walls, irregular surfaces | 25–40 years | $95–$160 | Difficult |
| Crystalline Waterproofing | Active leaks, porous concrete | Permanent (self-healing) | $110–$180 | Yes (brush-applied) |
| Bentonite Clay Panels | High water table, commercial-grade | 30+ years | $120–$200 | No |
| Dimple Drain Mat | Used over any membrane as drainage layer | 50+ years | $15–$35 | Yes |
Cost ranges reflect 2026 material and labor benchmarks from the National Association of Waterproofing and Structural Repair Contractors (NAWSRC).
Pro Tip: Don’t confuse dampproofing with waterproofing. Dampproofing (the brushed-on tar typically applied by builders during original construction) only resists moisture vapor — it is not designed to withstand hydrostatic pressure. True waterproofing membranes are engineered for water resistance under pressure, which is what most problem basements actually face.
Drainage Systems: The Unsung Hero
Even the best membrane in the world can’t do its job alone. Water management is a system, and drainage is the backbone of that system. Think of it as a three-part team: the membrane keeps water out of the wall, the drainage mat moves water downward, and the perimeter drain removes it entirely.
Exterior French Drain Installation
A properly installed exterior French drain consists of:
- A 4-inch perforated HDPE pipe laid at the base of the footing, sloped at a minimum of 1/8 inch per foot toward the outlet
- Surrounded by minimum 6 inches of clean crushed stone (3/4-inch washed gravel)
- Wrapped in a non-woven geotextile filter fabric to prevent soil migration and clogging
- Outlet directed to daylight at a lower grade, to a sump pit, or to a municipal storm drain (check local codes in 2026 — many municipalities now restrict direct storm drain connections)
Window Wells and Above-Grade Considerations
Don’t overlook basement windows. Egress window wells that lack proper drainage are a notorious entry point for water. In 2026, the International Residential Code (IRC) requires all window wells deeper than 44 inches to have a drain connected to the foundation drainage system or daylight. If yours don’t have this, it’s a relatively simple add-on during exterior waterproofing work.
Case Study — Columbus, Ohio, 2024: A homeowner with a 1958 split-level discovered that 80% of their basement water intrusion was entering not through the walls, but through two egress window wells that had no drainage. A contractor excavated, installed a full exterior membrane, added window well drains tied into a new perimeter system, and regraded the rear yard. Three heavy-rain seasons later, the basement has remained completely dry — no sump pump runs, no efflorescence, no odors.
DIY vs. Professional Installation
Let’s be honest about what’s realistically achievable without professional help — and what isn’t.
What you can realistically DIY:
- Surface cleaning and crack patching with hydraulic cement
- Applying crystalline waterproofing coatings on accessible walls
- Installing dimple mat drainage boards
- Regrading soil away from the foundation
- Extending downspouts and improving gutters
What requires professional expertise:
- Full-depth excavation safely and efficiently
- Identifying and addressing structural cracks or wall movement
- Proper membrane application without voids, wrinkles, or gaps
- Tying the drainage system into existing plumbing or storm infrastructure
- Working near buried utilities (always call 811 or your country’s equivalent before any digging)
The bottom line: exterior basement waterproofing is not a weekend warrior project for most homeowners. The excavation alone carries risks — cave-in, utility damage, and structural disturbance — that require experience and proper equipment. Most professionals recommend hiring a certified waterproofing contractor for the core work, while handling supplementary improvements (grading, gutters, interior humidity control) yourself.
Quick Tip: When evaluating contractors in 2026, look for membership in the Basement Health Association (BHA) or NAWSRC, ask for proof of insurance, and always request a written warranty that transfers with the home — typically 10 to 25 years for full exterior systems.
Cost Breakdown and What to Expect in 2026
One of the most frequent questions homeowners ask is: “How much is this going to cost me?” Exterior waterproofing is a significant investment, and the range is wide depending on your foundation size, soil conditions, water table level, and regional labor rates.
In 2026, here’s what you can realistically expect:
- Average full-perimeter exterior waterproofing (1,500 sq ft home): $18,000–$35,000
- Single-wall exterior waterproofing (targeting one problem wall): $5,000–$12,000
- Exterior French drain only (without membrane): $3,000–$8,000
- DIY materials only (membrane, drain pipe, stone, mat): $1,500–$4,500
These figures reflect a 15–20% increase from 2023 benchmarks, driven by continued labor shortages in skilled trades and elevated material costs across the construction industry. However, it’s worth noting that leaving the problem unaddressed typically costs far more over time — foundation repair costs in 2026 average between $25,000 and $90,000 for significant structural failures.
Visualizing the Cost vs. Risk Balance
Cost Comparison: Waterproofing Methods vs. Repair Costs
*Averages based on 2026 NAWSRC national data. Bar widths are proportional representations.
3 Common Mistakes (and How to Avoid Them)
Mistake #1: Stopping Short of the Footing
One of the most prevalent errors — even among some contractors — is failing to excavate all the way to the bottom of the footing. If your membrane stops 12 inches above the footing, water will simply travel under the membrane, accumulate at the base of the wall, and find its way in. Always insist on full-depth excavation and membrane installation to the footing level.
Mistake #2: Neglecting Proper Backfill
Backfilling with the same dense clay soil that was removed defeats the purpose of your drainage layer. Clay retains water, creating the same hydrostatic pressure buildup you just spent thousands to address. The rule: use clean crushed stone or free-draining gravel for at least the bottom 75% of the backfill zone, transitioning to native soil only in the top 12–18 inches near the surface.
Mistake #3: Ignoring the Root Causes
Waterproofing your foundation without addressing the reasons water is accumulating there in the first place is a partial solution at best. Before or alongside any waterproofing work, evaluate and correct:
- Gutters and downspouts — make sure they’re clean and extensions move water at least 6 feet from the foundation
- Yard grading — negative grade (sloping toward the house) is responsible for a shocking proportion of basement water problems
- Irrigation systems — sprinkler heads pointed toward the foundation add thousands of gallons of water annually right where you don’t want it
- Window wells — must have drains and covers to prevent water accumulation
Case Study — Portland, Oregon, 2025: A homeowner invested $22,000 in exterior waterproofing from a reputable contractor. Within 18 months, water was reappearing in the northeast corner of the basement. Investigation revealed the problem: a neighbor’s French drain was discharging directly uphill of that corner, and the homeowner’s gutters on that side were completely clogged and overflowing. The lesson? Waterproofing your walls is only one piece of a comprehensive water management strategy.
Frequently Asked Questions
How long does exterior basement waterproofing last?
When properly installed, modern exterior waterproofing systems are designed to last 20 to 40 years or more, depending on the membrane type. Sheet membranes and bentonite systems tend to have the longest lifespans, while liquid-applied rubber membranes typically carry 20–30 year performance warranties. Most reputable contractors offer transferable written warranties of 10 to 25 years, which is a significant selling point if you plan to sell your home. The drainage components (perforated pipe, gravel, fabric) are essentially permanent if installed correctly.
Can exterior waterproofing be done in winter or during rainy seasons?
Generally, no — or at least not ideally. Liquid-applied membranes require surface temperatures above 40°F (4°C) to cure properly, and many manufacturers void warranties for application in freezing conditions. Wet or saturated soil creates unstable excavation conditions and can prevent proper membrane bonding. The optimal windows for exterior waterproofing in most North American climates are late spring through early fall. If you have a critical water problem in winter, interior mitigation (temporary sump, drainage mat) is typically recommended as a bridge solution until conditions allow exterior work.
Will exterior waterproofing increase my home’s value?
Yes, measurably so. According to a 2025 survey by the National Association of Realtors, homes with documented and warrantied basement waterproofing systems sold for an average of 3–5% more than comparable homes without them, and spent significantly less time on market. In regions with high water tables or heavy precipitation — the Pacific Northwest, Great Lakes region, Atlantic Seaboard — buyers in 2026 increasingly treat basement waterproofing documentation as a non-negotiable due diligence item. Additionally, some homeowners’ insurance policies offer premium discounts for documented water mitigation improvements, though this varies significantly by carrier and region.
Your Waterproofing Roadmap: Protect Your Foundation, Protect Your Investment
You now have the knowledge framework to make smart, confident decisions about exterior basement waterproofing. Let’s turn that into a concrete action plan.
Your 5-Step Action Roadmap:
- Assess and document your current situation. Walk your basement perimeter during and after heavy rainfall. Photograph any efflorescence, cracks, or wet spots. Check your grade and gutters from the outside. This baseline documentation is invaluable when talking to contractors.
- Address the low-hanging fruit first. Clean and extend your downspouts, regrade any negative slopes within 6 feet of the foundation, and repair any window well drainage issues. These free-to-cheap measures sometimes solve 30–50% of minor moisture problems on their own.
- Get 3 professional assessments. Contact three licensed, insured waterproofing contractors — not handymen or general contractors. Request written proposals that specify the membrane type, drainage system details, warranty terms, and backfill protocol. Beware of vague proposals.
- Evaluate materials against your specific conditions. Share your soil type, water table information (your local county extension office or well driller can help), and foundation type with contractors. There is no one-size-fits-all solution — the right membrane for a poured concrete wall in sandy Ohio soil may be different from the right solution for a block foundation on clay-heavy Georgia red soil.
- Plan for the full system, not just the wall. Confirm that your project includes membrane, protection board, drainage mat, perimeter drain pipe, proper gravel backfill, and a connected outlet. If any of these elements is missing from the proposal, ask why.
As climate patterns continue shifting in 2026 — with more intense precipitation events, longer wet seasons, and rising water tables in many regions — basement water management is becoming less of a “nice-to-have” and more of a foundational home ownership responsibility. The homes that hold their value, remain structurally sound, and support healthy indoor environments over the next two decades will be the ones whose owners took a proactive, systems-thinking approach to water management.
The question isn’t whether your basement will face water pressure — it’s whether your foundation will be ready when it does. Are you building a waterproofing strategy that’s as durable as the home you’re protecting?